SkyLights - Tutorial (front and rear car lights)

Talk about the car skins/models, mods and share them !

Moderator: English Moderator

Skybreaker
Posts: 12
Joined: 19 Sep 2011, 14:44

SkyLights - Tutorial (front and rear car lights)

Post by Skybreaker »

..:: SkyLights Tutorial ::..

Image
... Image of result


I was aksed about a tutorial how to make the front and rear lights of my skin. so here we go...
I will not explain the basics of Skinning, the .dds files, the aplha layers ect...
You will surely find ohter posts and tutorials about this stuff around.

I am using Photoshop CS5 and the PS64-DDS Plugin.

My fist attemt for creating the front lights was a strange and very dificult way. After some hours i found an extremly easy way to get the "one stripe"-light or whatever you want to call it...

You will need two files to get the Lights working that way:

The first: DetailsDiffuse.dds
Contains the car detail textures. The smaller stuff like lights, steats, windows ect.

The second: DetailsIllum.dds
Here you will find everything that "glows" like the lights.

Now the fun begins...


..:: START ::..

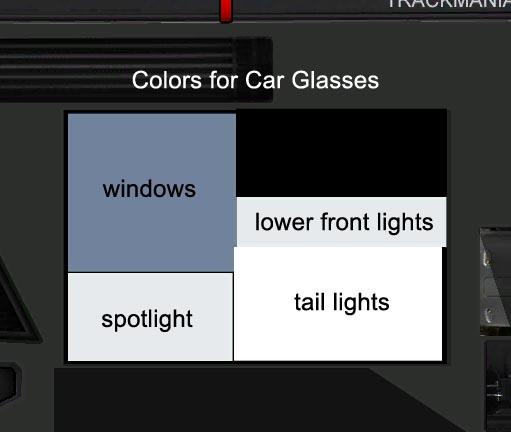
First we start of with the easy part. The DetailsDiffuse.dds. Import the file to Photoshop (or any other program you prefer). You will see a lot of stuff and need to find the lights and the glasses. Glasses? Why? I will explain that later. They're the most important for the front.

Image
... front lights, rear lights, glasses

The image up here shows all three parts you need. Left are are everything for the front lights. In the center you can see the rear lights. And Thoose boring squares on the right are the glasses. We start with making the rear led-like lights...
Last edited by Skybreaker on 21 Sep 2011, 12:37, edited 7 times in total.
Skybreaker
Posts: 12
Joined: 19 Sep 2011, 14:44

Re: Skybreaker Lights (Front + Rear)

Post by Skybreaker »

..:: REAR - STEP 1 ::..

First I've removed the strange purple lines. Just Paint them over with black. After that, i gave the lights another color. I just draw a selection and used HUE slider to get a more orange.
Edit: The Purple lines are between the big main lights and the bigger outer line. As you see in the post of Xpowaspa on the next page, you can also color it, and give it glow like everything else

Image
... three easy steps to create led style

Then I sliced the tree main lights into small squares to have always the same distance to each circle I will create. Just draw the "outline and outside" (inversed) of the cirlces. Make them black with an opacity of around 50%.

Last step is the creation of the inner circles. This time white, set to overlay with an opacity of 25%. Also jused inner and outer glow to make it a litte more... glow and smooth edges.

Tip: Create the circles at only one bar and copy it over. Sizes of three are alomost the same.

Now you can export the file. Nothing more to do for the backlights in the DetailsDiffuse.dds... We have now switch to the DetailsIllum.dds.


..:: REAR - STEP 2 ::..

Import the DetailsIllum.dds to Photoshop. As you will see, you will see not that much. But for our luck the backlights are already shown. I just copied over my steps i used in before. Removed the purple stuff, give it a color change, and draw the circles (copy the layers of the other file). So i get the almost same result, just brighter.

You dont have to to do anything with the alpha channel. Of course you can play around with that, but i will come to that point later. Just export again as .dds and you're done.
Last edited by Skybreaker on 21 Sep 2011, 15:47, edited 9 times in total.
Skybreaker
Posts: 12
Joined: 19 Sep 2011, 14:44

Re: Skybreaker Lights (Front + Rear)

Post by Skybreaker »

..:: FRONT- STEP 1 ::..

Now we are making the front lights. Just reopen (or if it's open already - swtich back) to the DetailsDiffuse.dds.
Just look above to find the all the stuff for the front lights. I will explain the easy way to create the lights like they're shown on the picture.

The front and rear lights also have glasses on front of them. The trick to get lights like that is, that you are making everything that is behind the glass glow. And the glass itself gets no opacity. Just a thin line gets full opacity, where the glowing light that is behind, can shine through. That was my idea after hours of trying, and it's working!

Now there's a really hard thing to to... Just paint over everything front related with black! ... Yes! Just do it! So you get everything in black ingame. Aplha channel can be untouched.

Image
... hardest step of all

I mentioned the glass above. It's also in the same file. Look the first post to find the glasses. The lower left suqare is the one for the front lights. Just draw two black bars on the top and bottom of the square. The more white the color is, the more transparent it will be. White is most transparent, black let nothing through. As you can think of, the light behind that glass, will only find the way though the white area.

Image
... lower left square for front lights - Black area blocks the light

Also here the aplha channel can be untouched. The glass don't uses the alpha channel. Just the greyscale.
Edit: ...ok it don't uses JUST the greyscale. Thanks to Balmung. Just tested around. You can surely add colors to your glasses. But the the brightness in fact decides the opacity of the glass.

That's it in the DetailsDiffuse.dds. Export the file and move over again to the DetailsIllum.dds...


..:: FRONT- STEP 2 ::..

Now reopen or switch back again to the DetailsIllum.dds file. This will make our stuff behind the glass glow. In this file, everything is related to colors and aplha settings. You can imagine that you need to find all the stuff you created black for the front lights one step before.

The easiest way to get the exactly match is to make a selection of the whole picture, excluding the black painted area made in the other file. Copy the selection to the second file and inverse it. now you have the exactly position of the stuff you need.

Image
... everything made the same color

As you see i just painted all over with a light blue. so everything thats behind the glass will glow blue. Now make a selection of all the blue again and move to the aplha layer. Fill the area with grey (#ababab). This gives me the bloom and glow effect you see on the picture (only if you have bloom enabled in game).

Export the file and you're done! That's it!
Last edited by Skybreaker on 21 Sep 2011, 12:48, edited 4 times in total.
Skybreaker
Posts: 12
Joined: 19 Sep 2011, 14:44

Re: Skybreaker Lights (Front + Rear)

Post by Skybreaker »

..:: EXTRAS ::..

As you know, creativity is limitless...

For example. You can just draw other stuff on the glass. like two bars, triangles, circles or whatever you like. just remember that everything thats white on the glass will let the light through, everything that's black will block the light.

An example: a dot style from Xpowaspa. Click Here

You can also try differend colors. Even for the same light. In this tutorial i painted the whole front lights light blue. But you can also use yellows or reds, or different colors togheter. Just play around.

The alpha channel in the DetailsIllum.dss lets you adjust the amount of glow. But aware: After a certian dakness the glow only shows up when you brake! Because the breaking in game makes the rear lights glowing more. I think it was #000000 to #303030. Betwen this you get the break-glow. Above that, the intensity of glowing depends of the brightness you paint in the alpha channel.

You can also make the same i've done for the front for the back. Meaning you paint everything rear light related black, make everything glow and be creative for the rear light glass (one of the right glasses it was - see Balmung's Picture below).

Everything else whats about glowing (see picture in the first post with glowing grill outline and T logo) works always the same. The DetailsIllum.dds is the key for glowing. Just search your parts, paint them over the color you want to glow and set up the alpha channel. But glowing will only work for night tracks.

Thanks to Balmung: Uploaded a picture where you can see the glasses and what they are for.
See this post: http://forum.maniaplanet.com/viewtopic. ... 121#p69947
Last edited by Skybreaker on 21 Sep 2011, 15:52, edited 7 times in total.
Skybreaker
Posts: 12
Joined: 19 Sep 2011, 14:44

Re: Skybreaker Lights (Front + Rear)

Post by Skybreaker »

..:: FINAL WORDS ::..

I have to say my english isn't that good. Was very good at school but don't know. Sometimes I think it's hard to understand what i mean. But I hope you will...

If there are any suggestions, anything you want to say, feel free to contribute.

If you're creating some cool stuff. Let others see what you've done. I'm also interested to see great light effects.

I hope you have fun with this.

.SkyBreaker
Last edited by Skybreaker on 20 Sep 2011, 11:24, edited 2 times in total.
HexDar
Posts: 7
Joined: 17 Aug 2011, 14:53

Re: SkyLights - Tutorial (front and rear car lights)

Post by HexDar »

Big thanks skybreaker for your tutorial. my english is also bad but i understand what you mean. :thumbsup:
User avatar
Trackmaniack
Posts: 2137
Joined: 16 Jun 2010, 16:16
Location: Iowa City, IA
Contact:

Re: SkyLights - Tutorial (front and rear car lights)

Post by Trackmaniack »

I'm a native english speaker and this is a wonderful tut. Thanks a -lot- for this :D :clap:
WIP
Friction
Posts: 24
Joined: 13 Sep 2011, 04:46

Re: SkyLights - Tutorial (front and rear car lights)

Post by Friction »

Do those files go with the car when we zip it ?
User avatar
Balmung
Posts: 251
Joined: 14 Aug 2010, 18:37

Re: SkyLights - Tutorial (front and rear car lights)

Post by Balmung »

Image

This is not only the color, its a texture, you can make stripes in to the glass.
luisroyo
Posts: 17
Joined: 14 Sep 2011, 16:08

Re: SkyLights - Tutorial (front and rear car lights)

Post by luisroyo »

Thx, Danke ! :thumbsup: (jetzt hoffe ich nur das ich das ganze bald in Ergebnisse umsetzten kann) :cry: :? :)
Post Reply

Return to “Workbench”

Who is online

Users browsing this forum: No registered users and 2 guests